acrylic paint, Art, Painting
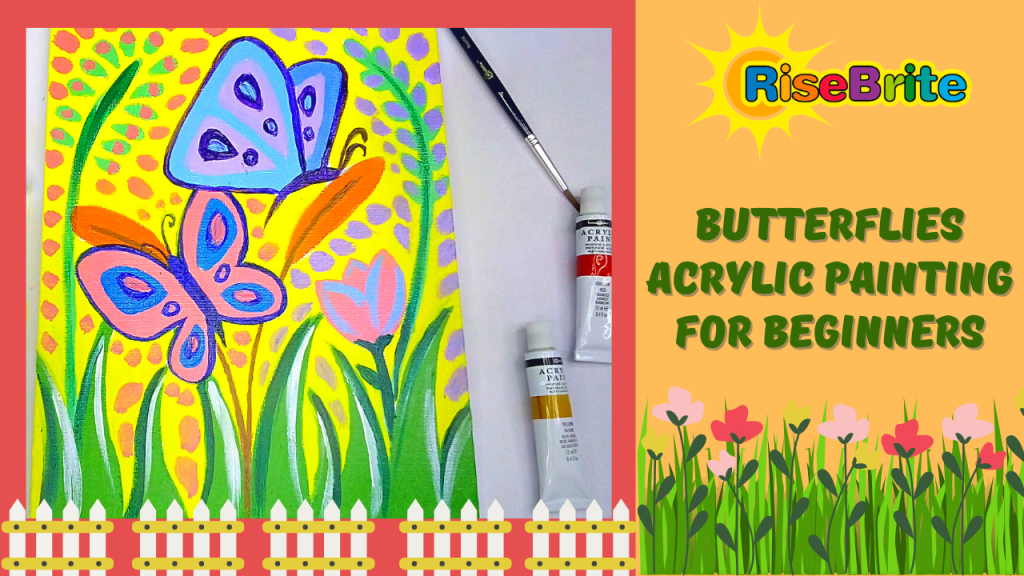
Easy Acrylic Butterfly Painting For Beginners And Kids
Jun
Butterflies are one of the easiest subjects to paint for kids and beginners. If you’re choosing new experiments for your kid’s art sessions, there’s nothing more beautiful than painting a butterfly. Colorful wings, delicate curves, and intrinsic hues and patterns, all sum up together to create cute easy butterfly paintings. Not to forget, you can easily transform your painting into a butterfly with a flower painting.
There is more than art to butterflies. They are symbolic of transformation and freshness. If you teach your kid to make a butterfly, do not forget to tell them about how butterflies refer to new beginnings and renewed life.
To help you with easy butterfly painting for kids and beginners, we are here with a guide that will assist you to make the painting – right from the start. Let’s begin.
CHECK OUT THE VIDEO TUTORIAL ON YOUTUBE
Techniques to Paint Butterfly in Easy Manner
Beginner butterfly paintings with acrylic colors are easy to paint. However, every art practice has some rules and techniques that make the work easier and better. The acrylic painting also comes with a few techniques that can help you get a more finished and refined look for your painting. Let’s learn those techniques.
Dry-Brushing
If you are using acrylic paints directly to the surface without using water, you will create uneven lines of paint with hard edges. However, this dry brush application creates a strong current of color and results in a purposeful painting effect.
Detailing
The detailing technique is used to add more depth to the painting. With small, fine brush strokes, you can create interesting effects into the subject, such as the whites of the eye.
Washing
When you use acrylic paint like watercolors by diluting it with water, it creates a translucent wash surface. This technique is useful for creating a variety of textures in one painting.
Supplies Needed for Butterfly Painting for Beginners
You need to have different materials to begin colorful butterfly painting with flowers. Following is the list of all the art supplies you would need:
- A high-quality set of acrylic paints
- A sheet of watercolor paper
- Flat and round paint brushes in small, medium, and big sizes
- A pencil
- Painting palette
Step By Step Easy Acrylic Butterfly with Flowers Painting
The Sketch
In this sketch, we are going to draw two butterflies amidst flowers and leaves. One of the butterflies is in the flight position by a flower. The other butterfly is sitting on a flower.
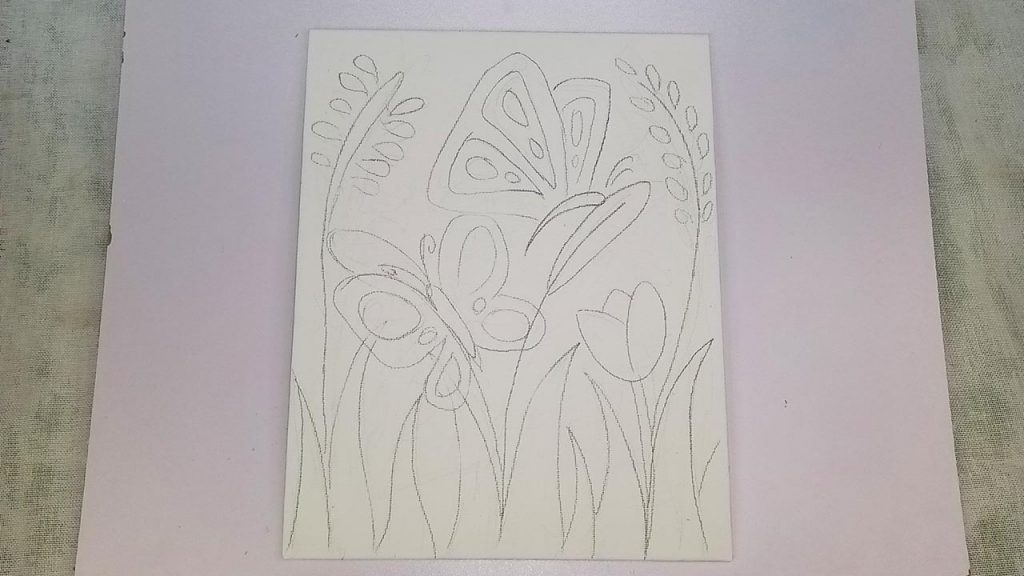
The First Butterfly – In the Flight Position
Take an A4 size drawing sheet or any other surface of your choice. Also, use a 2HB pencil to have a light sketch.
Begin your painting by drawing some long bush-like leaves at the bottom of the paper. Amidst the leaves, draw a long leaf with a bud-life flower that looks like peeping out of the bushes. On the top of the leaf, begin drawing the butterfly.
In order to draw the butterfly, start by making the rough structure of a butterfly’s body. Do not forget to add two tiny antennas. For the wings, make a curved triangular shape. Do remember that we need to make the painting as realistic as possible. Therefore, draw by free hand to create fine curves and do not use a compass or other tool.
Now, create a line in the middle of the curved triangle to divide it into two equal parts. Create two smaller triangles inside it at equal distances. Make the same lines on the behind of the current triangular shape. These will be your second set of butterfly wings. They will give the look of one set of wings peeking out behind the front ones. Make one half-appearing triangle inside it, just like the one you did on the front wing.
It’s now time to add some detailing to the butterfly design. The wings of the butterfly have vein-like patterns. To imitate the shape and flexibility of the wings, draw curved designs into smaller triangles.
The Second Butterfly – Sitting by the Flower
For the second butterfly, make the same bud-like flower with a long leaf as you drew for the first butterfly. Be careful and keep some distance between the first flower and the second flower. Just a little below the flower bud, draw the body of the butterfly. Remember, we now need to make it in a way that gives the illusion of the butterfly sitting on the stem of the flower.
On either side of the body of the butterfly, draw rough curved triangular shapes on the upper half. Without joining the lower end of the triangle to the body, curve it into another curved triangle joining its end to the lower half of the body. Make sure that the triangles you drew first are larger than the later ones. Through this technique, you have the beautifully curved wings of the butterfly on both sides.
Make similar short triangles inside these triangles. It would act as detailing for the butterfly wings. You can also make smaller circles inside the wings.
You are now done with both the wings of butterflies. Do not forget to make two antennas on the head of the butterfly body. Your butterflies are ready!
Now fill the white space around them with more flowers and leaves.
A Helpful SimplificationTip
The sketch is relatively easier than the other butterfly designs available. It is also one of the best and preferred ways of presenting your artwork. However, if creating a whole sketch overwhelms you, do not panic. Many people find it to be monotonous and difficult, especially in the beginning.
You can transfer the butterfly pattern to your painting surface without the need to sketch it. You will need graphite paper. Using it, simply trace the pattern of butterflies and flowers on the paper. You can also use a stencil if you like.
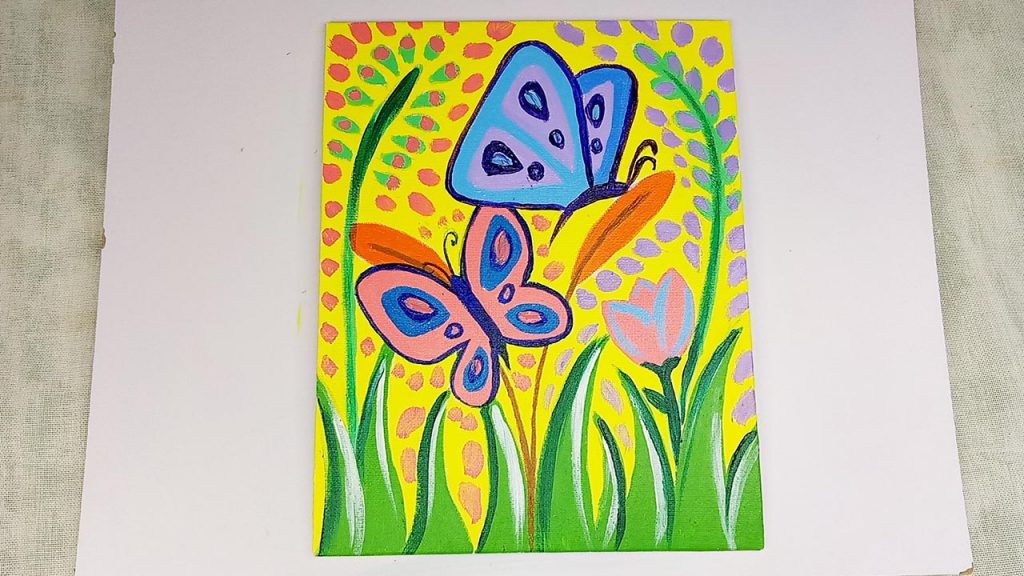
The Acrylic Butterfly Art
Now you can move on to coloring the butterflies on a flower painting.
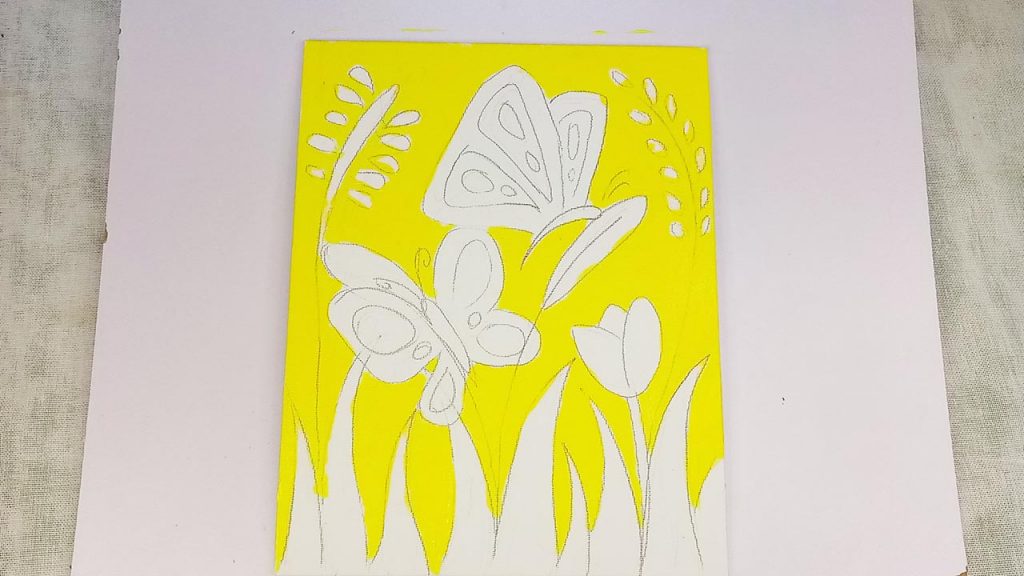
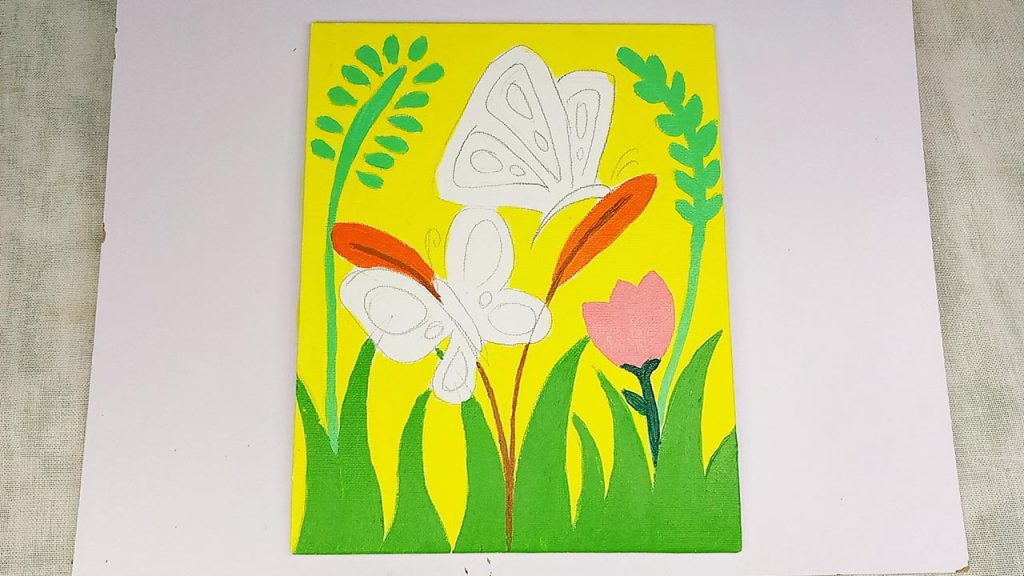
Painting The Bright Colored Background
Instead of coloring the butterflies or the flowers first, begin by coloring the background. We recommend using a light color such as yellow that lets the main design highlight your DIY butterfly painting. Paint it using a fine brush and cover every white space area where you have not designed any element. Pass your brush slowly near the lines of flowers and leaves. You do not want to ruin the painting by mistakenly coloring other elements.
Once you are done, let the paint dry a little bit. If you begin to paint new colors instantly, the wet colors may blend into each other ruining your painting. After which, your painting should look something like the below.
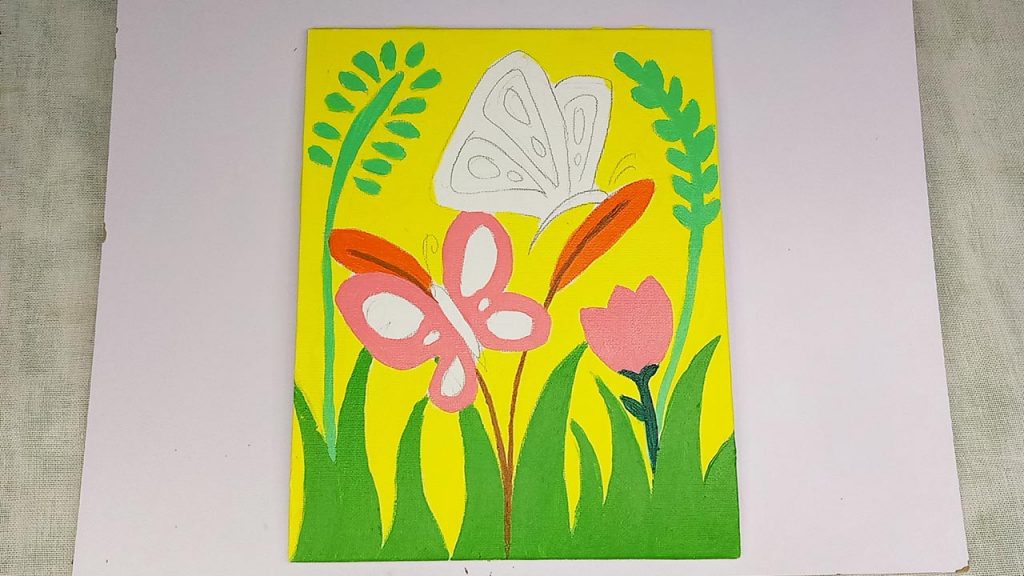
Painting The Flowers And Plants
Now use the green color to paint the leaves at the bottom. It’s time to paint the other leaves and the flower buds. To bring out a contrasting effect in the painting, use colors like orange and light green to paint them.
Take a brush of small size and fine points to paint the stem of the leaves and the flower buds. As they need to look like detailed thin lines, make smaller strokes. You can use a dark color like brown for the stem. Now, highlight the flower stem using the dark green color. To paint the petals, use a pink color.
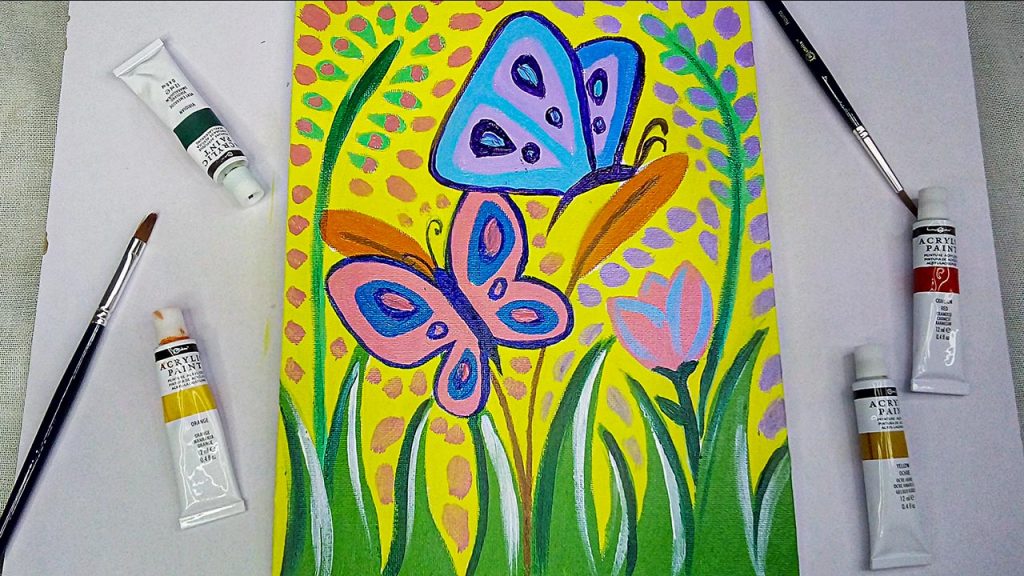
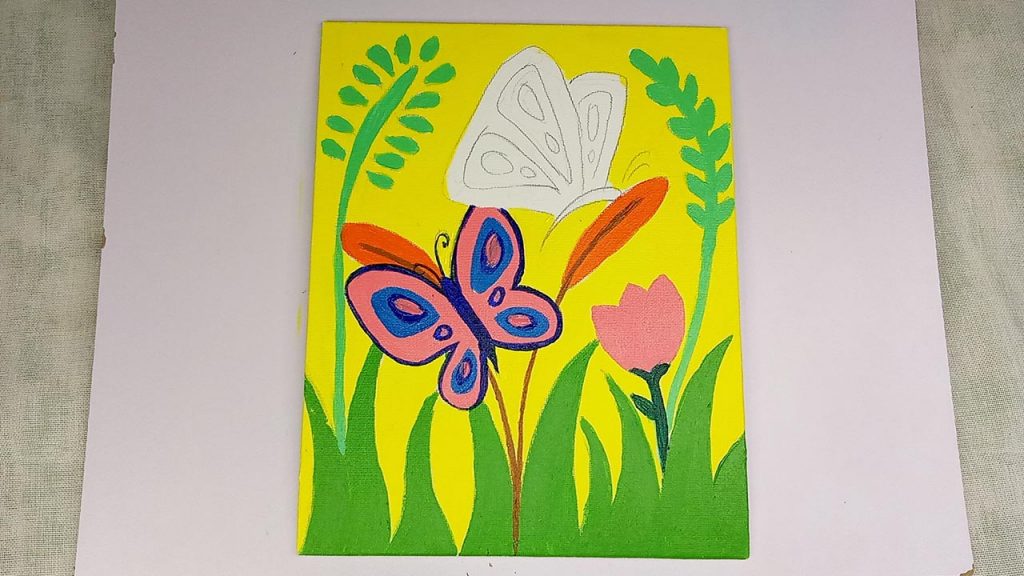
Painting The Pink And Blue Butterflies
To paint the butterflies, you should use a combination of dark and light colors. For painting the pink butterfly in the lower position sitting on the flower, use the same shade of pink that you did for the flower in its outer wings.
For the body of the butterfly, use a dark shade of blue. In the patterns of the wings, a light blue shade will look well-blended into the painting. Use brown color to paint the antennas of the butterfly. Paint the outlines of the wings with dark blue color.
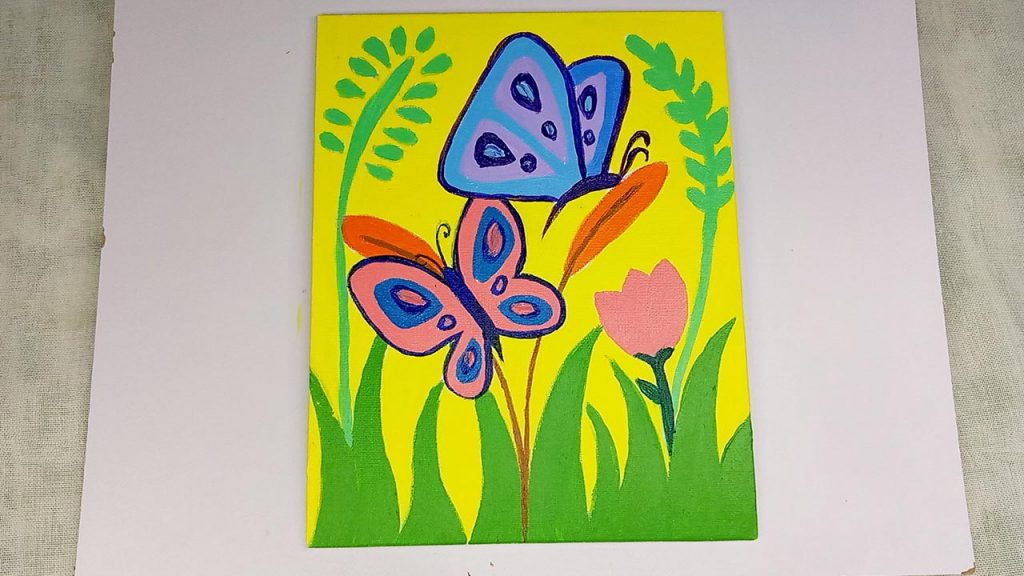
Now do the same to paint the blue and purple butterfly. Use paint colors like sky blue, pastel purple, and dark blue to color it.
The Final Details
Adding Whimsical Dots
Use orange color to add detailing in one-half of the painting. Take a large brush and create small round circle-like structures all over the yellow background. Do the same on the other half using the pastel purple color.
Outline The Flower
You can also make some lines in the petals of the flower with sky blue color.
Enhancing The Grass
In the end, use the white and dark green colors to make lines on the leaves. It will give an illusion of fuller leaves.
And voila, you are done! Your butterfly acrylic painting for beginners is ready.
Check out our companion YouTube video on ‘canvas painting butterfly’ as a reference while painting. This easy-to-follow video tutorial will help you attain preciseness with.


